Activiti7工作流引擎 一.准备工作 1.1创建一个activiti的maven工程 1.2.idea下载插件
1.3.pom.xml配置 1 2 3 4 5 6 7 8 9 10 11 12 13 14 15 16 17 18 19 20 21 22 23 24 25 26 27 28 29 30 31 32 33 34 35 36 37 38 39 40 41 42 43 44 45 46 47 48 49 50 51 52 53 54 55 56 57 58 59 60 61 62 63 64 65 66 67 68 69 70 71 72 73 74 75 76 77 78 79 80 81 82 83 84 85 86 87 88 89 90 91 92 93 94 95 96 97 98 99 100 101 102 103 104 105 106 107 108 109 110 <dependencies > <dependency > <groupId > org.springframework.boot</groupId > <artifactId > spring-boot-starter-web</artifactId > </dependency > <dependency > <groupId > org.springframework.boot</groupId > <artifactId > spring-boot-configuration-processor</artifactId > <optional > true</optional > </dependency > <dependency > <groupId > org.springframework.boot</groupId > <artifactId > spring-boot-starter-test</artifactId > <scope > test</scope > </dependency > <dependency > <groupId > org.springframework.boot</groupId > <artifactId > spring-boot-starter-security</artifactId > </dependency > <dependency > <groupId > org.projectlombok</groupId > <artifactId > lombok</artifactId > </dependency > <dependency > <groupId > mysql</groupId > <artifactId > mysql-connector-java</artifactId > <version > 8.0.29</version > </dependency > <dependency > <groupId > com.baomidou</groupId > <artifactId > mybatis-plus-boot-starter</artifactId > <version > 3.5.3.1</version > </dependency > <dependency > <groupId > cn.hutool</groupId > <artifactId > hutool-all</artifactId > <version > 5.7.22</version > </dependency > <dependency > <groupId > com.baomidou</groupId > <artifactId > mybatis-plus-boot-starter</artifactId > <version > 3.5.3.1</version > </dependency > <dependency > <groupId > org.activiti.dependencies</groupId > <artifactId > activiti-dependencies</artifactId > <version > 7.1.0.M6</version > <scope > import</scope > <type > pom</type > </dependency > <dependency > <groupId > org.activiti</groupId > <artifactId > activiti-engine</artifactId > <version > 7.1.0.M6</version > </dependency > <dependency > <groupId > org.activiti</groupId > <artifactId > activiti-spring</artifactId > <version > 7.1.0.M6</version > </dependency > <dependency > <groupId > org.activiti</groupId > <artifactId > activiti-bpmn-model</artifactId > <version > 7.1.0.M6</version > </dependency > <dependency > <groupId > org.activiti</groupId > <artifactId > activiti-bpmn-converter</artifactId > <version > 7.1.0.M6</version > </dependency > <dependency > <groupId > org.activiti</groupId > <artifactId > activiti-json-converter</artifactId > <version > 7.1.0.M6</version > </dependency > <dependency > <groupId > org.activiti</groupId > <artifactId > activiti-bpmn-layout</artifactId > <version > 7.1.0.M6</version > </dependency > <dependency > <groupId > org.activiti.cloud.dependencies</groupId > <artifactId > activiti-cloud-dependencies</artifactId > <version > 7.1.0.M6</version > <scope > import</scope > <type > pom</type > </dependency > <dependency > <groupId > org.mybatis</groupId > <artifactId > mybatis</artifactId > <version > 3.5.10</version > </dependency > <dependency > <groupId > commons-dbcp</groupId > <artifactId > commons-dbcp</artifactId > <version > 1.4</version > </dependency > <dependency > <groupId > org.apache.commons</groupId > <artifactId > commons-io</artifactId > <version > 1.3.2</version > </dependency > </dependencies >
1.4.添加log4j.porperties日志配置 1 2 3 4 5 6 7 8 9 10 11 12 13 14 15 log4j.rootCategory =debug, CONSOLE, LOGFILE log4j.logger.org.apache.axis.enterprise =FATAL, CONSOLE log4j.appender.CONSOLE =org.apache.log4j.ConsoleAppender log4j.appender.CONSOLE.layout =org.apache.log4j.PatternLayout log4j.appender.CONSOLE.layout.ConversionPattern =%d{ISO8601} %-6r[%15.15t] %-5p %30.30c %x - %m\n log4j.appender.LOGFILE =org.apache.log4j.FileAppender log4j.appender.LOGFILE.File =\Users\zhengcan\act\activiti.log log4j.appender.LOGFILE.Append =true log4j.appender.LOGFILE.layout =org.apache.log4j.PatternLayout log4j.appender.LOGFILE.layout.ConversionPattern =%d{ISO8601} %-6r[%15.15t] %-5p %30.30c %x - %m\n
1.5.添加activiti.cfg.xml配置文件 1 2 3 4 5 6 7 8 9 10 11 12 13 14 15 16 17 18 19 20 21 22 23 24 25 26 <?xml version="1.0" encoding="UTF-8" ?> <beans xmlns ="http://www.springframework.org/schema/beans" xmlns:xsi ="http://www.w3.org/2001/XMLSchema-instance" xmlns:context ="http://www.springframework.org/schema/context" xmlns:tx ="http://www.springframework.org/schema/tx" xsi:schemaLocation ="http://www.springframework.org/schema/beans http://www.springframework.org/schema/beans/spring-beans.xsd http://www.springframework.org/schema/contex http://www.springframework.org/schema/context/spring-context.xsd http://www.springframework.org/schema/tx http://www.springframework.org/schema/tx/spring-tx.xsd" > <bean id ="dataSource" class ="org.apache.commons.dbcp.BasicDataSource" > <property name ="driverClassName" value ="com.mysql.cj.jdbc.Driver" /> <property name ="url" value ="jdbc:mysql:///activiti?useUnicode=true& characterEncoding=utf-8& useSSL=false" /> <property name ="username" value ="root" /> <property name ="password" value ="12345678" /> <property name ="maxActive" value ="3" /> <property name ="maxIdle" value ="1" /> </bean > <bean id ="processEngineConfiguration" class ="org.activiti.engine.impl.cfg.StandaloneProcessEngineConfiguration" > <property name ="dataSource" ref ="dataSource" /> <property name ="databaseSchemaUpdate" value ="true" /> </bean > </beans >
1.6.java类编写程序生成表 创建一个测试类,调用activiti工具类,生成activiti需要的数据库表
直接使用activiti提供的工具类ProcessEngines,会默认读取classPath下的activiti.cgf.xml文件,读取其中的数据库配置,创建ProcessEngine,在创建ProcessEngine时会自动创建表。
1 2 3 4 5 6 7 8 9 10 11 12 13 @Test public void testProcess1 () { ProcessEngine processEngine = ProcessEngines.getDefaultProcessEngine(); System.out.println(processEngine); }
说明 :
1、运行以上程序段即可完成 activiti 表创建,通过改变 activiti.cfg.xml 中databaseSchemaUpdate 参数的值执行
不同的数据表处理策略。 2 、 上 边 的 方法 getDefaultProcessEngine方法在执行时,从activiti.cfg.xml 中找固定的名称
processEngineConfiguration 。
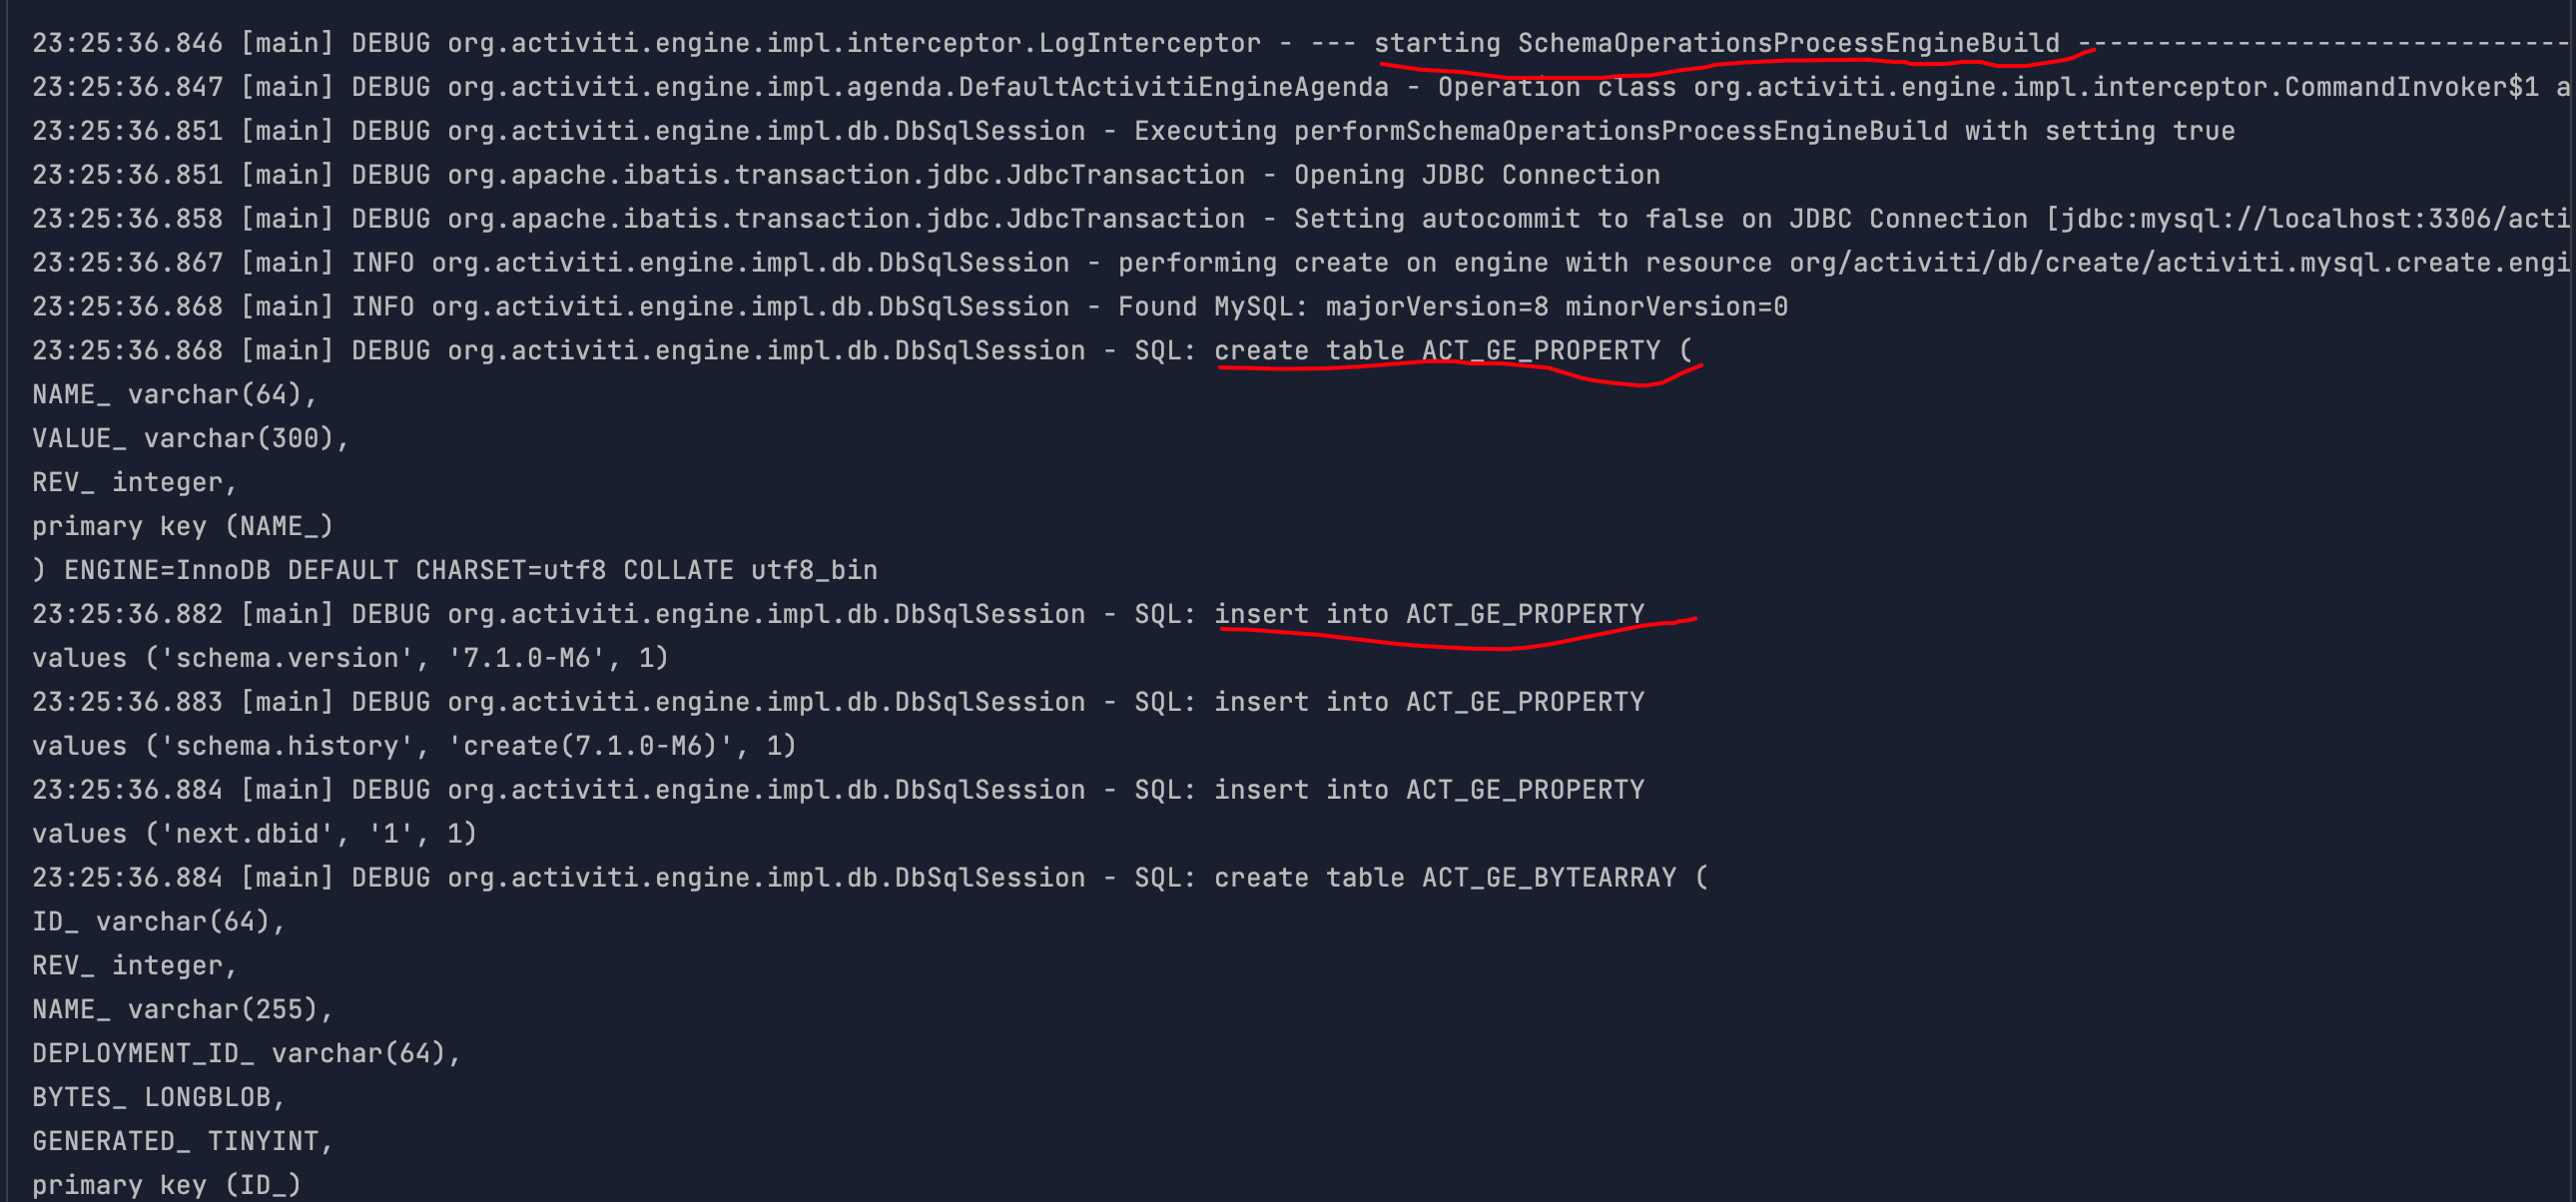
在测试程序执行过程中,idea的控制台会输出日志,说明程序正在创建数据表,类似如下,注意红线内容:
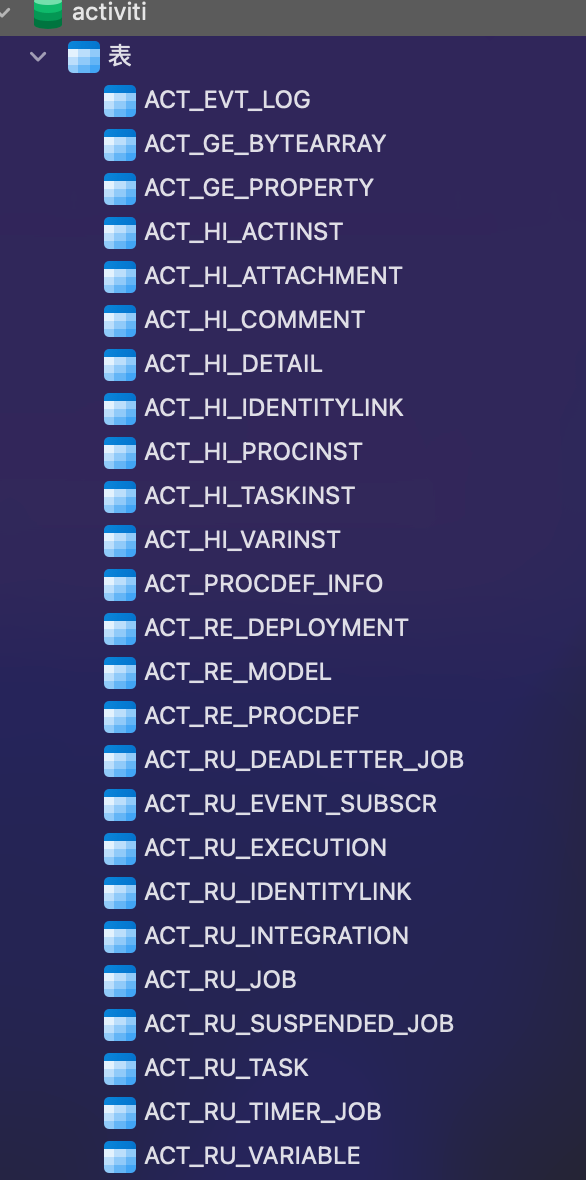
执行完之后我们就创建了25张表:
到这,我们就完成activiti运行需要的数据库和表的创建。
二.表结构说明 2.1 表的命名规则和作用 看到刚才创建的表,我们发现Activiti 的表都以 ACT_ 开头。
第二部分是表示表的用途的两个字母标识。 用途也和服务的 API 对应。 ACT_RE :’RE’表示 repository。 这个前缀的表包含了流程定义和流程静态资源 (图片,规则,等等)。 ACT_RU :’RU’表示 runtime。 这些运行时的表,包含流程实例,任务,变量,异步任务,等运行中的数据。 Activiti 只在流程实例执行过程中保存这些数据, 在流程结束时就会删除这些记录。 这样运行时表可以一直很小速度很快。 ACT_HI :’HI’表示 history。 这些表包含历史数据,历史流程实例, 变量,任务等等。 ACT_GE : GE 表示 general。 通用数据, 用于不同场景下
2.2 Activiti数据表介绍
表分类
表名
解释
一般数据
[ACT_GE_BYTEARRAY]
通用的流程定义和流程资源
[ACT_GE_PROPERTY]
系统相关属性
[ACT_HI_ACTINST]
历史的流程实例
[ACT_HI_ATTACHMENT]
历史的流程附件
[ACT_HI_COMMENT]
历史的说明性信息
[ACT_HI_DETAIL]
历史的流程运行中的细节信息
[ACT_HI_IDENTITYLINK]
历史的流程运行过程中用户关系
流程历史记录
[ACT_HI_PROCINST]
历史的流程实例
[ACT_HI_TASKINST]
历史的任务实例
[ACT_HI_VARINST]
历史的流程运行中的变量信息
流程定义表
[ACT_RE_DEPLOYMENT]
部署单元信息
[ACT_RE_MODEL]
模型信息
[ACT_RE_PROCDEF]
已部署的流程定义
运行实例表
[ACT_RU_EVENT_SUBSCR]
运行时事件
[ACT_RU_EXECUTION]
运行时流程执行实例
[ACT_RU_IDENTITYLINK]
运行时用户关系信息,存储任务节点与参与者的相关信息
[ACT_RU_JOB]
运行时作业
[ACT_RU_TASK]
运行时任务
[ACT_RU_VARIABLE]
运行时变量表
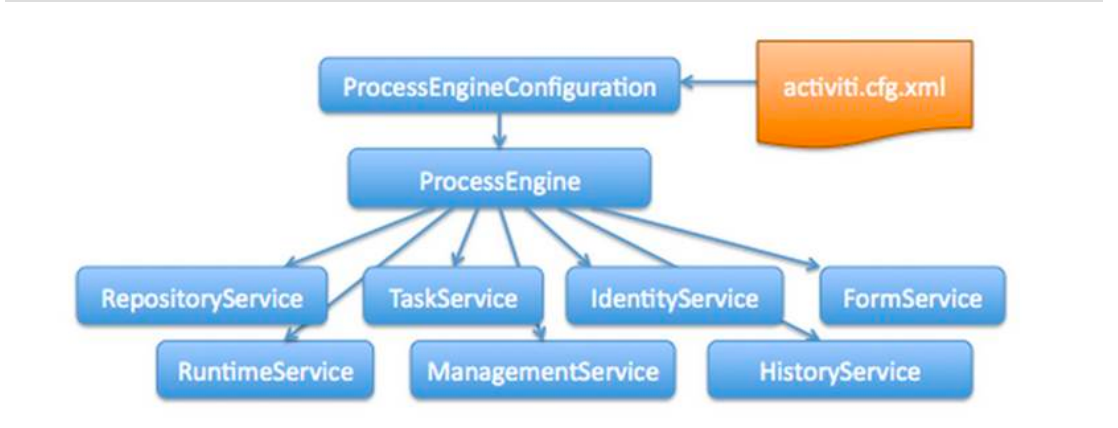
三、Activiti类关系图 3.1类关系图
在新版本中,我们通过实验可以发现IdentityService,FormService两个Serivce都已经删除了
3.2 activiti.cfg.xml activiti的引擎配置文件,包括:ProcessEngineConfiguration的定义、数据源定义、事务管理器等,此文件其实就是一个spring配置文件。
3.3 流程引擎配置类 流程引擎的配置类(
ProcessEngineConfiguration),通过ProcessEngineConfiguration可以创建工作流引擎ProceccEngine,常用的两种方法如下:
3.3.1 StandaloneProcessEngineConfiguration 使用StandaloneProcessEngineConfigurationActiviti可以单独运行,来创建ProcessEngine,Activiti会自己处理事务。
配置文件方式:
通常在activiti.cfg.xml配置文件中定义一个id为processEngineConfiguration的bean。
方法如下:
1 2 3 4 5 6 7 8 9 10 11 <bean id ="processEngineConfiguration" class ="org.activiti.engine.impl.cfg.StandaloneProcessEngineConfiguration" > <property name ="jdbcDriver" value ="com.mysql.jdbc.Driver" /> <property name ="jdbcUrl" value ="jdbc:mysql:///activiti" /> <property name ="jdbcUsername" value ="root" /> <property name ="jdbcPassword" value ="123456" /> <property name ="databaseSchemaUpdate" value ="true" /> </bean >
还可以加入连接池:
1 2 3 4 5 6 7 8 9 10 11 12 13 14 15 16 17 18 19 20 21 22 23 24 25 <?xml version="1.0" encoding="UTF-8" ?> <beans xmlns ="http://www.springframework.org/schema/beans" xmlns:xsi ="http://www.w3.org/2001/XMLSchema-instance" xmlns:context ="http://www.springframework.org/schema/context" xmlns:tx ="http://www.springframework.org/schema/tx" xsi:schemaLocation ="http://www.springframework.org/schema/beans http://www.springframework.org/schema/beans/spring-beans.xsd http://www.springframework.org/schema/contex http://www.springframework.org/schema/context/spring-context.xsd http://www.springframework.org/schema/tx http://www.springframework.org/schema/tx/spring-tx.xsd" > <bean id ="dataSource" class ="org.apache.commons.dbcp.BasicDataSource" > <property name ="driverClassName" value ="com.mysql.jdbc.Driver" /> <property name ="url" value ="jdbc:mysql:///activiti" /> <property name ="username" value ="root" /> <property name ="password" value ="123456" /> <property name ="maxActive" value ="3" /> <property name ="maxIdle" value ="1" /> </bean > <bean id ="processEngineConfiguration" class ="org.activiti.engine.impl.cfg.StandaloneProcessEngineConfiguration" > <property name ="dataSource" ref ="dataSource" /> <property name ="databaseSchemaUpdate" value ="true" /> </bean > </beans >
3.3.2 SpringProcessEngineConfiguration 通过org.activiti.spring.SpringProcessEngineConfiguration 与 Spring整合。
创建spring与activiti的整合配置文件:
activiti-spring.cfg.xml (名称可修改)
1 2 3 4 5 6 7 8 9 10 11 12 13 14 15 16 17 18 19 20 21 22 23 24 25 26 27 28 29 30 31 32 33 34 35 36 37 38 39 40 41 42 43 44 45 46 47 48 49 50 51 52 53 54 55 56 57 58 59 60 61 62 63 64 65 66 67 68 69 70 71 72 <beans xmlns ="http://www.springframework.org/schema/beans" xmlns:xsi ="http://www.w3.org/2001/XMLSchema-instance" xmlns:mvc ="http://www.springframework.org/schema/mvc" xmlns:context ="http://www.springframework.org/schema/context" xmlns:aop ="http://www.springframework.org/schema/aop" xmlns:tx ="http://www.springframework.org/schema/tx" xsi:schemaLocation ="http://www.springframework.org/schema/beans http://www.springframework.org/schema/beans/spring-beans-3.1.xsd http://www.springframework.org/schema/mvc http://www.springframework.org/schema/mvc/spring-mvc-3.1.xsd http://www.springframework.org/schema/context http://www.springframework.org/schema/context/spring-context-3.1.xsd http://www.springframework.org/schema/aop http://www.springframework.org/schema/aop/spring-aop-3.1.xsd http://www.springframework.org/schema/tx http://www.springframework.org/schema/tx/spring-tx-3.1.xsd " > <bean id ="processEngineConfiguration" class ="org.activiti.spring.SpringProcessEngineConfiguration" > <property name ="dataSource" ref ="dataSource" /> <property name ="transactionManager" ref ="transactionManager" /> <property name ="databaseSchemaUpdate" value ="drop-create" /> <property name ="jobExecutorActivate" value ="false" /> </bean > <bean id ="processEngine" class ="org.activiti.spring.ProcessEngineFactoryBean" > <property name ="processEngineConfiguration" ref ="processEngineConfiguration" /> </bean > <bean id ="repositoryService" factory-bean ="processEngine" factory-method ="getRepositoryService" /> <bean id ="runtimeService" factory-bean ="processEngine" factory-method ="getRuntimeService" /> <bean id ="taskService" factory-bean ="processEngine" factory-method ="getTaskService" /> <bean id ="historyService" factory-bean ="processEngine" factory- method ="getHistoryService" /> <bean id ="identityService" factory-bean ="processEngine" factory- method ="getIdentityService" /> <bean id ="managementService" factory-bean ="processEngine" factory- method ="getManagementService" /> <bean id ="dataSource" class ="org.apache.commons.dbcp.BasicDataSource" > <property name ="driverClassName" value ="com.mysql.jdbc.Driver" /> <property name ="url" value ="jdbc:mysql://localhost:3306/activiti" /> <property name ="username" value ="root" /> <property name ="password" value ="mysql" /> <property name ="maxActive" value ="3" /> <property name ="maxIdle" value ="1" /> </bean > <bean id ="transactionManager" class ="org.springframework.jdbc.datasource.DataSourceTransactionManager" > <property name ="dataSource" ref ="dataSource" /> </bean > <tx:advice id ="txAdvice" transaction-manager ="transactionManager" > <tx:attributes > </tx:attributes > <tx:method name ="save*" propagation ="REQUIRED" /> <tx:method name ="insert*" propagation ="REQUIRED" /> <tx:method name ="delete*" propagation ="REQUIRED" /> <tx:method name ="update*" propagation ="REQUIRED" /> <tx:method name ="find*" propagation ="SUPPORTS" read-only ="true" /> <tx:method name ="get*" propagation ="SUPPORTS" read-only ="true" /> </tx:attributes > </tx:advice > <aop:config proxy-target-class ="true" > <aop:advisor advice-ref ="txAdvice" pointcut ="execution(* com.itheima.ihrm.service.impl.*.(..))" * /> </aop:config > </beans >
创建processEngineConfiguration
1 ProcessEngineConfiguration engineConfiguration = ProcessEngineConfiguration.createProcessEngineConfigurationFromResource("activiti.cfg.xml" );
上边的代码要求activiti.cfg.xml中必须有一个processEngineConfiguration的bean
也可以使用下边的方法,更改bean 的名字:
1 ProcessEngineConfiguration.createProcessEngineConfigurationFromResource(String resource, String beanName);
3.4 工作流引擎创建 工作流引擎(ProcessEngine),相当于一个门面接口,通过ProcessEngineConfiguration创建processEngine,通过ProcessEngine创建各个service接口。
3.4.1 默认创建方式 将activiti.cfg.xml文件名及路径固定,且activiti.cfg.xml文件中有 processEngineConfiguration的配置, 可以使用如下代码创建processEngine:
3.4.2 一般创建方式 3.5 Service服务接口 Service是工作流引擎提供用于进行工作流部署、执行、管理的服务接口,我们使用这些接口可以就是操作服务对应的数据表
3.5.1 Service创建方式 通过ProcessEngine创建Service
方式如下:
1 2 3 RuntimeService runtimeService = processEngine.getRuntimeService();RepositoryService repositoryService = processEngine.getRepositoryService();TaskService taskService = processEngine.getTaskService();
4.5.2 Service总览
service名称
service左右
RepositoryService
activiti的资源管理类
RuntimeService
activiti的流程运行管理类
TaskService
activiti的任务管理类
HistoryService
activiti的历史管理类
ManagerService
activiti的引擎管理类
简单介绍:
RepositoryService
是activiti的资源管理类,提供了管理和控制流程发布包和流程定义的操作。使用工作流建模工具设计的业务流程图需要使用此service将流程定义文件的内容部署到计算机。
除了部署流程定义以外还可以:查询引擎中的发布包和流程定义。
暂停或激活发布包,对应全部和特定流程定义。 暂停意味着它们不能再执行任何操作了,激活是对应的反向操作。
获得多种资源,像是包含在发布包里的文件, 或引擎自动生成的流程图。
获得流程定义的pojo版本, 可以用来通过java解析流程,而不必通过xml。
RuntimeService
Activiti的流程运行管理类。可以从这个服务类中获取很多关于流程执行相关的信息
TaskService
Activiti的任务管理类。可以从这个类中获取任务的信息
HistoryService
Activiti的历史管理类,可以查询历史信息,执行流程时,引擎会保存很多数据(根据配置),比如流程实例启动时间,任务的参与者, 完成任务的时间,每个流程实例的执行路径,等等。 这个服务主要通过查询功能来获得这些数据。
ManagementService
Activiti的引擎管理类,提供了对 Activiti 流程引擎的管理和维护功能,这些功能不在工作流驱动的应用程序中使用,主要用于 Activiti 系统的日常维护。
四.Activi入门 创建Activiti工作流主要包含以下几步:
1、定义流程,按照BPMN的规范,使用流程定义工具,用流程符号 把整个流程描述出来
2、部署流程,把画好的流程定义文件,加载到数据库中,生成表的数据
3、启动流程,使用java代码来操作数据库表中的内容
4.1流程符号 它由Business Process Management Initiative这个非营利协会创建并不断发展。作为一种标识,BPMN 2.0是使用一些符
号 来明确业务流程设计流程图的一整套符号规范,它能增进业务建模时的沟通效率。
目前BPMN2.0是最新的版本,它用于在BPM上下文中进行布局和可视化的沟通。
接下来我们先来了解在流程设计中常见的 符号。
BPMN2.0的基本符合 主要包含:
事件 Event
活动 Activity
活动是工作或任务的一个通用术语。一个活动可以是一个任务,还可以是一个当前流程的子处理流程; 其次,你还可以为活动指定不同的类型。常见活动如下:
网关 GateWay
网关用来处理决策,有几种常用网关需要了解:
排他网关(x)
——只有一条路径会被选择。流程执行到该网关时,按照输出流的顺序逐个计算,当条件的计算结果为true时,继续执行当前网关的输出流;
如果多条线路计算结果都是 true,则会执行第一个值为 true 的线路。如果所有网关计算结果没有true,则引擎会抛出异常。
排他网关需要和条件顺序流结合使用,default 属性指定默认顺序流,当所有的条件不满足时会执行默认顺序流。
并行网关 (+)
——所有路径会被同时选择
拆分 —— 并行执行所有输出顺序流,为每一条顺序流创建一个并行执行线路。
合并 —— 所有从并行网关拆分并执行完成的线路均在此等候,直到所有的线路都执行完成才继续向下执行。
包容网关 (〇)
—— 可以同时执行多条线路,也可以在网关上设置条件
拆分 —— 计算每条线路上的表达式,当表达式计算结果为true时,创建一个并行线路并继续执行
合并 —— 所有从并行网关拆分并执行完成的线路均在此等候,直到所有的线路都执行完成才继续向下执行。
事件网关 (+)
—— 专门为中间捕获事件设置的,允许设置多个输出流指向多个不同的中间捕获事件。当流程执行到事件网关后,流程处于等待状态,需要等待抛出事件才能将等待状态转换为活动状态。
流向Flow
流是连接两个流程节点的连线,常见的流向包含以下几种:
4.2流程设计器使用 Activiti-Designer****使用
Palette****(画板)
在idea中安装插件即可使用,画板中包括以下结点:
Connection—连接
Event—事件
Task—任务
Gateway—网关
Container—容器
Boundary event—边界事件
Intermediate event- -中间事件
流程图设计完毕保存生成.bpmn文件
新建流程 (IDEA**工具 )**
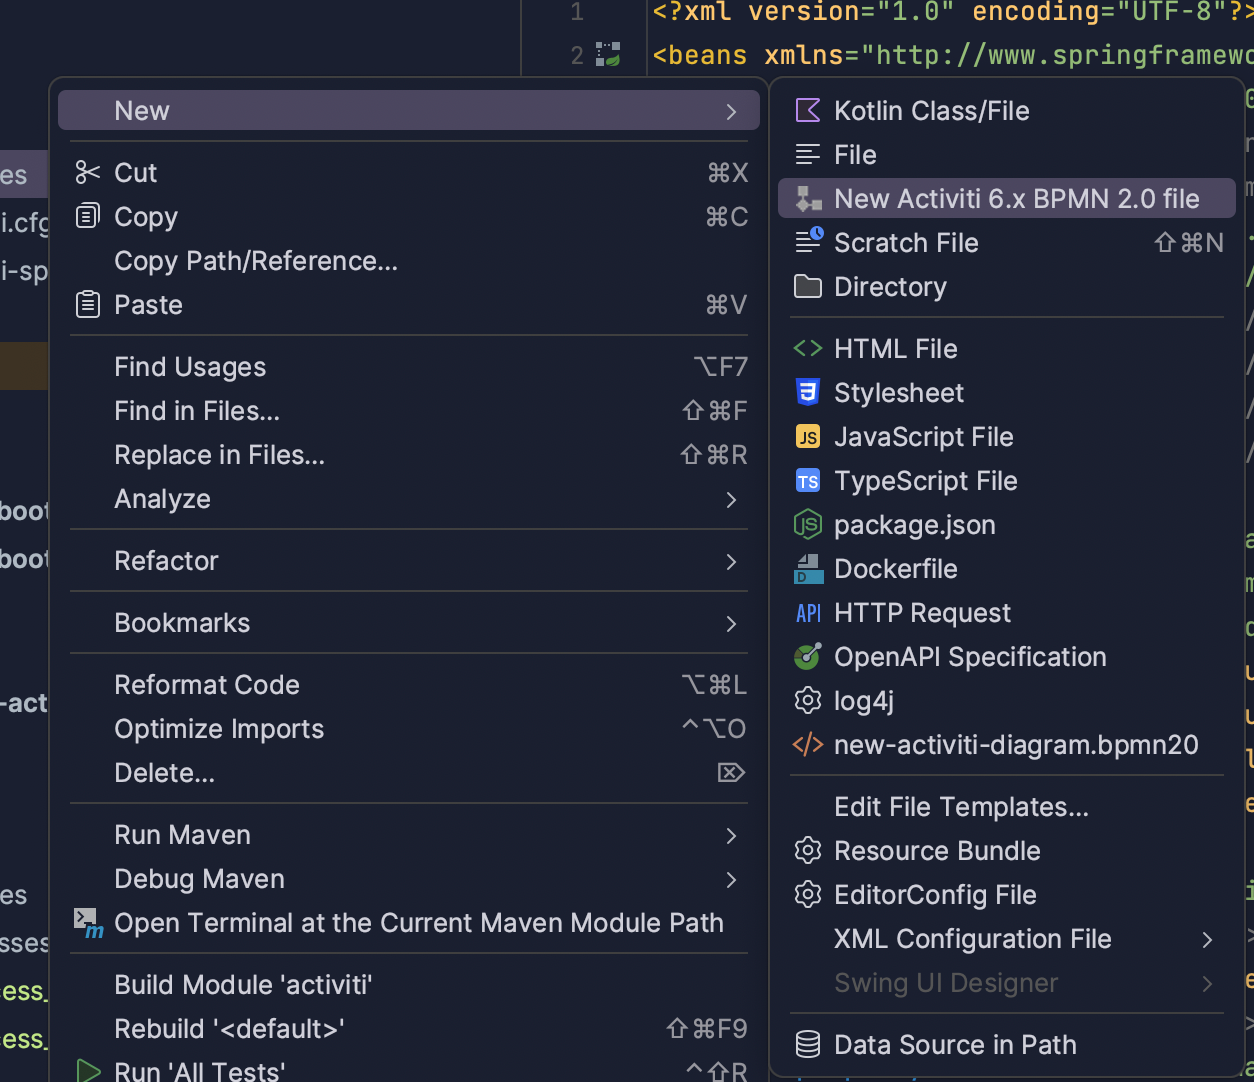
首先选中存放图形的目录(选择resources下的bpmn目录),点击菜单:New -> BpmnFile,如图:
弹出如下图所示框,输入evection表示出差审批流程:
起完名字evection后(默认扩展名为bpmn),就可以看到流程设计页面,如图所示:
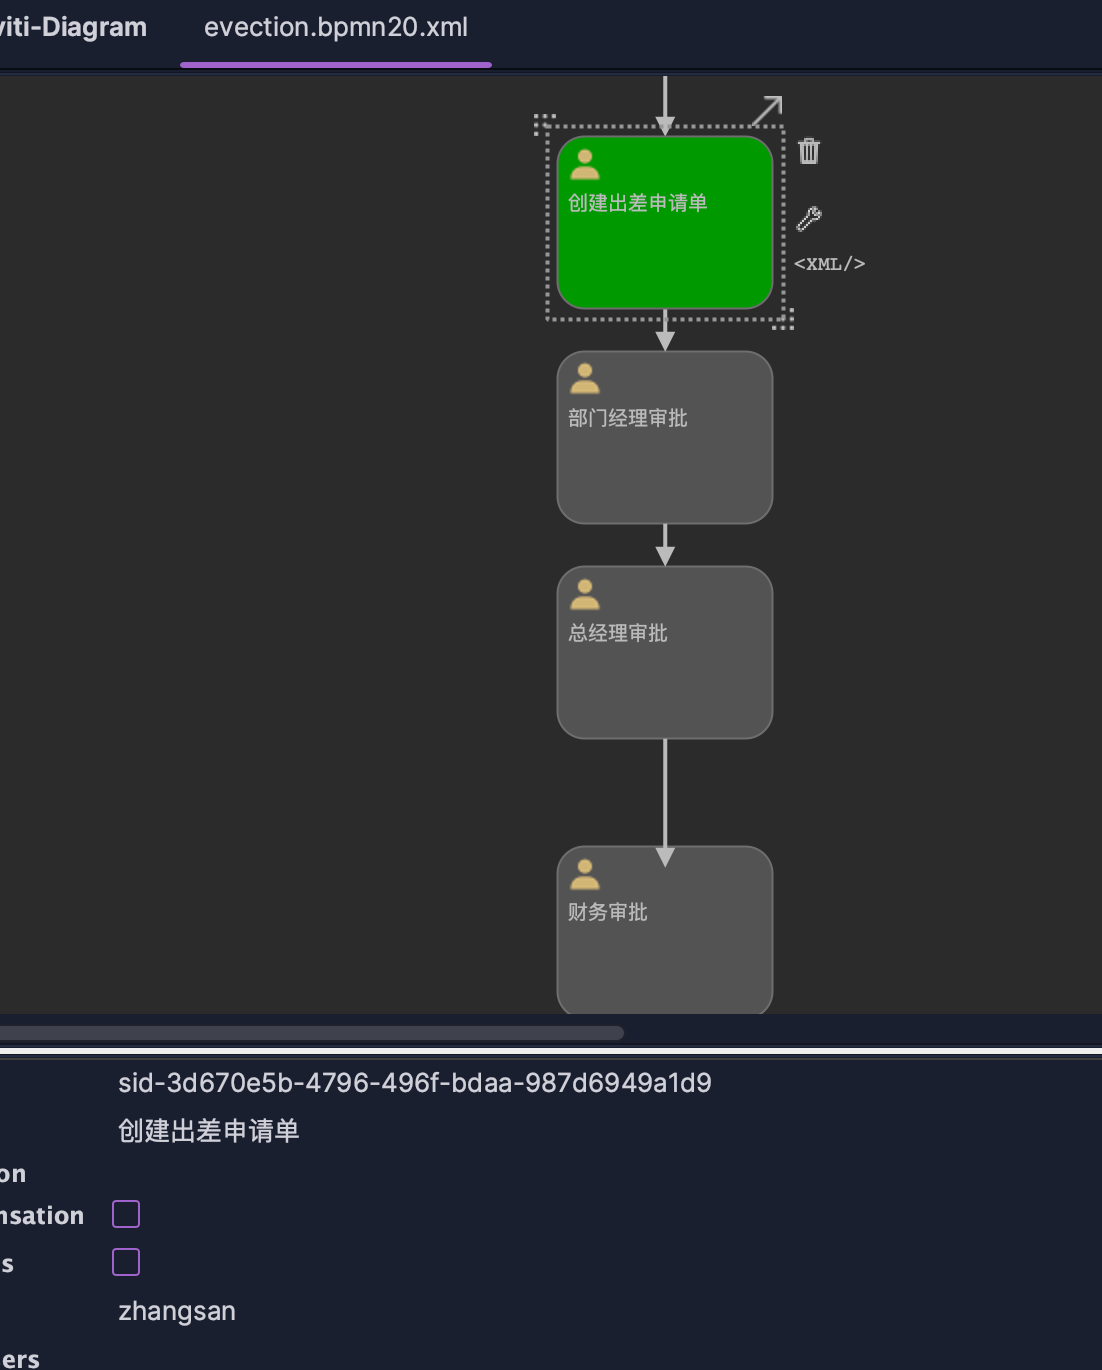
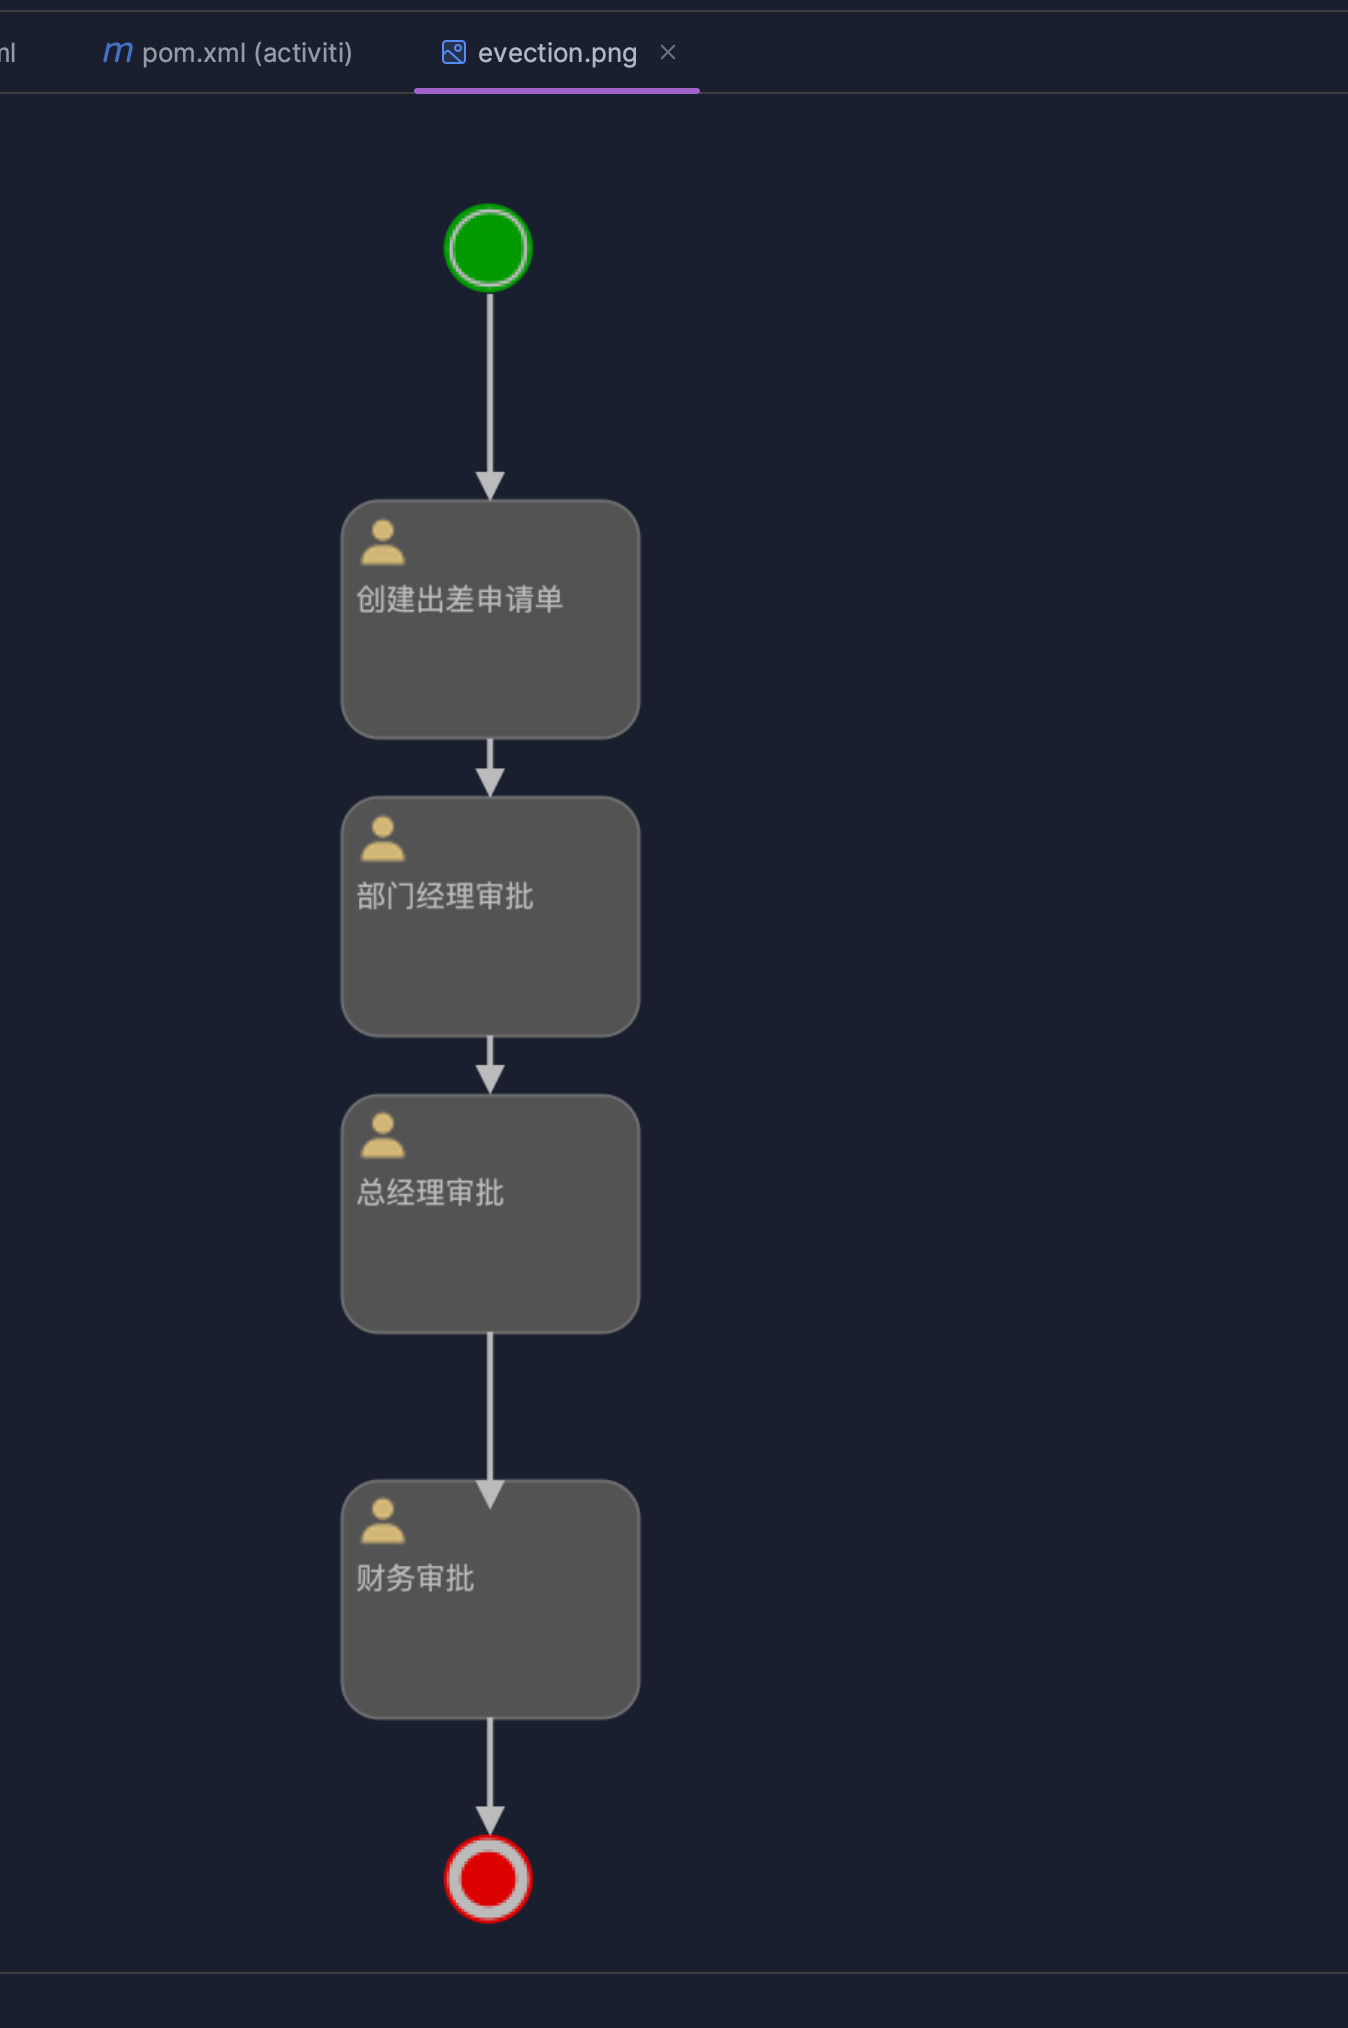
绘制流程:
指定任务负责人为张三,生成png文件
五.流程操作 5.1 流程定义部署 概述
将上面在设计器中定义的流程部署到activiti数据库中,就是流程定义部署。
通过调用activiti的api将流程定义的bpmn和png两个文件一个一个添加部署到activiti中,也可以将两个文件打成zip包进行部署。
单个文件部署方式
分别将bpmn文件和png图片文件部署。
1 2 3 4 5 6 7 8 9 10 11 12 13 14 15 16 17 18 19 @Test public void deployment () { ProcessEngine processEngine = ProcessEngines.getDefaultProcessEngine(); RepositoryService repositoryService = processEngine.getRepositoryService(); Deployment deployment = repositoryService.createDeployment() .addClasspathResource("evection.bpmn20.xml" ) .addClasspathResource("evection.png" ) .name("出差申请流程" ) .deploy(); System.out.println("流程部署id:" +deployment.getId()); System.out.println("流程部署名称:" +deployment.getName()); }
执行此操作后activiti会将上边代码中指定的bpm文件和图片文件保存在activiti数据库。
压缩包部署方式
将evection.bpmn和evection.png压缩成zip包。
1 2 3 4 5 6 7 8 9 10 11 12 13 14 15 16 17 18 19 20 21 @Test public void deployProcessByZip () { InputStream inputStream = this .getClass() .getClassLoader() .getResourceAsStream("evection.zip" ); ZipInputStream zipInputStream = new ZipInputStream (inputStream); ProcessEngine processEngine = ProcessEngines.getDefaultProcessEngine(); RepositoryService repositoryService = processEngine.getRepositoryService(); Deployment deployment = repositoryService.createDeployment() .addZipInputStream(zipInputStream) .deploy(); System.out.println("流程部署名称" +deployment.getName()); System.out.println("流程部署id" +deployment.getId()); }
执行此操作后activiti会将上边代码中指定的bpm文件和图片文件保存在activiti数据库。
操作数据表
流程定义部署后操作activiti的3张表如下:
act_re_deployment 流程定义部署表,每部署一次增加一条记录
act_re_procdef 流程定义表,部署每个新的流程定义都会在这张表中增加一条记录
act_ge_bytearray 流程资源表
接下来我们来看看,写入了什么数据:
1 SELECT * FROM act_re_deployment #流程定义部署表,记录流程部署信息
结果:
1 SELECT * FROM act_re_procdef #流程定义表,记录流程定义信息 1
结果:
注意,KEY 这个字段是用来唯一识别不同流程的关键字
1 SELECT * FROM act_ge_bytearray #资源表
结果:
注意:
act_re_deployment和act_re_procdef一对多关系,一次部署在流程部署表生成一条记录,但一次部署可以部署多个流程定义,每个流程定义在流程定义表生成一条记录。每一个流程定义在act_ge_bytearray会存在两个资源记录,bpmn 和png。
建议:一次部署一个流程,这样部署表和流程定义表是一对一有关系,方便读取流程部署及流程定义信息。
5.2 启动流程实例 流程定义部署在activiti后就可以通过工作流管理业务流程了,也就是说上边部署的出差申请流程可以使用了。针对该流程,启动一个流程表示发起一个新的出差申请单,这就相当于java类与java对象的关系,类定义好后需要new创建一个对象使用,当然可以new多个对象。对于请出差申请流程,张三发起一个出差申请单需要启动一个流程实例,出差申请单发起一个出差单也需要启动一个流程实例。
代码如下:
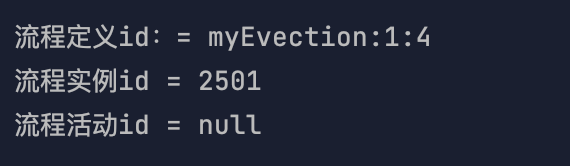
1 2 3 4 5 6 7 8 9 10 11 12 13 14 15 16 @Test public void testStartProcess () { ProcessEngine processEngine = ProcessEngines.getDefaultProcessEngine(); RuntimeService runtimeService = processEngine.getRuntimeService(); ProcessInstance processInstance = runtimeService.startProcessInstanceByKey("myEvection" ); System.out.println("流程定义id:= " + processInstance.getProcessDefinitionId()); System.out.println("流程实例id = " + processInstance.getId()); System.out.println("流程活动id = " + processInstance.getActivityId()); }
输出内容如下:
操作数据表
act_hi_actinst 流程实例执行历史
act_hi_identitylink 流程的参与用户历史信息
act_hi_procinst 流程实例历史信息
act_hi_taskinst 流程任务历史信息
act_ru_execution 流程执行信息
act_ru_identitylink 流程的参与用户信息
act_ru_task 任务信息
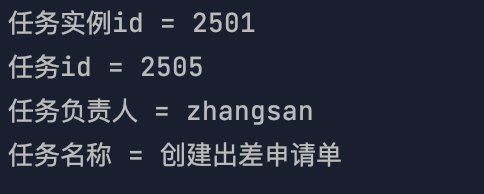
5.3 任务查询 1 2 3 4 5 6 7 8 9 10 11 12 13 14 15 16 17 18 19 20 21 22 23 @Test public void testFindPersonalTaskList () { String assgine = "zhangsan" ; ProcessEngine processEngine = ProcessEngines.getDefaultProcessEngine(); TaskService taskService = processEngine.getTaskService(); List<Task> list = taskService.createTaskQuery() .processDefinitionKey("myEvection" ) .taskAssignee(assgine) .list(); for (Task task : list) { System.out.println("任务实例id = " + task.getProcessInstanceId()); System.out.println("任务id = " + task.getId()); System.out.println("任务负责人 = " + task.getAssignee()); System.out.println("任务名称 = " + task.getName()); } }
输出结果如下:
5.4 流程任务处理 任务负责人查询待办任务,选择任务进行处理,完成任务。
1 2 3 4 5 6 7 8 9 10 11 12 13 14 15 16 17 18 @Test public void completeTask () { ProcessEngine processEngine = ProcessEngines.getDefaultProcessEngine(); TaskService taskService = processEngine.getTaskService(); Task task = taskService.createTaskQuery() .processDefinitionKey("myEvection" ) .taskAssignee("zhangsan" ) .singleResult(); taskService.complete(task.getId()); }
5.5 流程定义信息查询 查询流程相关信息,包含流程定义,流程部署,流程定义版本
1 2 3 4 5 6 7 8 9 10 11 12 13 14 15 16 17 18 19 20 21 22 23 24 25 26 27 28 29 30 @Test public void queryProcessDefinition () { ProcessEngine processEngine = ProcessEngines.getDefaultProcessEngine(); RepositoryService repositoryService = processEngine.getRepositoryService(); ProcessDefinitionQuery processDefinitionQuery = repositoryService.createProcessDefinitionQuery(); List<ProcessDefinition> definitionList = processDefinitionQuery.processDefinitionKey("myEvection" ) .orderByProcessDefinitionVersion() .desc() .list(); for (ProcessDefinition processDefinition : definitionList) { System.out.println("流程定义 id = " + processDefinition.getId()); System.out.println("流程定义 name = " + processDefinition.getName()); System.out.println("流程定义 key = " + processDefinition.getKey()); System.out.println("流程定义 version = " + processDefinition.getVersion()); System.out.println("流程部署Id = " + processDefinition.getDeploymentId()); } }
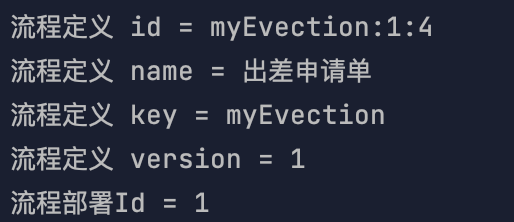
输出结果:
5.6 流程删除 1 2 3 4 5 6 7 8 9 10 11 12 13 14 15 @Test public void deleteDeployment () { String deploymentId = "1" ; ProcessEngine processEngine = ProcessEngines.getDefaultProcessEngine(); RepositoryService repositoryService = processEngine.getRepositoryService(); repositoryService.deleteDeployment(deploymentId); }
说明:
1)使用repositoryService删除流程定义,历史表信息不会被删除
2)如果该流程定义下没有正在运行的流程,则可以用普通删除。
如果该流程定义下存在已经运行的流程,使用普通删除报错,可用级联删除方法将流程及相关记录全部删除。
先删除没有完成流程节点,最后就可以完全删除流程定义信息
项目开发中级联删除操作一般只开放给超级管理员使用.
5.7 流程资源下载 现在我们的流程资源文件已经上传到数据库了,如果其他用户想要查看这些资源文件,可以从数据库中把资源文件下
载到本地。
解决方案有:
1、jdbc对blob类型,clob类型数据读取出来,保存到文件目录
2、使用activiti的api来实现
使用commons-io.jar 解决IO的操作
引入commons-io依赖包
1 2 3 4 5 <dependency > <groupId > org.apache.commons</groupId > <artifactId > commons-io</artifactId > <version > 2.6</version > </dependency >
通过流程定义对象获取流程定义资源,获取bpmn和png
1 2 3 4 5 6 7 8 9 10 11 12 13 14 15 16 17 18 19 20 21 22 23 24 25 26 27 28 29 30 31 32 33 34 35 @Test public void queryBpmnFile () throws IOException { ProcessEngine processEngine = ProcessEngines.getDefaultProcessEngine(); RepositoryService repositoryService = processEngine.getRepositoryService(); ProcessDefinition processDefinition = repositoryService.createProcessDefinitionQuery() .processDefinitionKey("myEvection" ) .singleResult(); String deploymentId = processDefinition.getDeploymentId(); InputStream pngInput = repositoryService.getResourceAsStream(deploymentId, processDefinition.getDiagramResourceName()); InputStream bpmnInput = repositoryService.getResourceAsStream(deploymentId, processDefinition.getResourceName()); File file_png = new File ("/Users/zhengcan/Desktop/bpmn/evectionflow01.png" ); File file_bpmn = new File ("/Users/zhengcan/Desktop/bpmn/evectionflow01.bpmn" ); FileOutputStream pngOut = new FileOutputStream (file_png); FileOutputStream bpmnOut = new FileOutputStream (file_bpmn); IOUtils.copy(pngInput, pngOut); IOUtils.copy(bpmnInput, bpmnOut); pngOut.close(); bpmnOut.close(); pngInput.close(); bpmnInput.close(); }
说明:
deploymentId为流程部署ID
resource_name为act_ge_bytearray表中NAME_列的值
使用repositoryService的getDeploymentResourceNames方法可以获取指定部署下得所有文件的名称
使用repositoryService的getResourceAsStream方法传入部署ID和资源图片名称可以获取部署下指定名称文件的输入流
最后的将输入流中的图片资源进行输出。
5.8流程历史信息查看 即使流程定义已经删除了,流程执行的历史信息通过前面的分析,依然保存在activiti的act_hi_*相关的表中。所以我们还是可以查询流程执行的历史信息,可以通过HistoryService来查看相关的历史记录。
1 2 3 4 5 6 7 8 9 10 11 12 13 14 15 16 17 18 19 20 21 22 23 24 25 26 27 28 @Test public void findHistoryInfo () { ProcessEngine processEngine = ProcessEngines.getDefaultProcessEngine(); HistoryService historyService = processEngine.getHistoryService(); HistoricActivityInstanceQuery instanceQuery = historyService.createHistoricActivityInstanceQuery(); instanceQuery.processDefinitionId("myEvection:1:4" ); instanceQuery.orderByHistoricActivityInstanceEndTime().asc(); List<HistoricActivityInstance> activityInstanceList = instanceQuery.list(); for (HistoricActivityInstance historicActivityInstance : activityInstanceList) { System.out.println(historicActivityInstance.getId()); System.out.println(historicActivityInstance.getActivityName()); System.out.println(historicActivityInstance.getProcessDefinitionId()); System.out.println(historicActivityInstance.getProcessDefinitionId()); System.out.println("<==================================================>" ); } }


 wechat
 alipay